Tank upgrades can be performed from within the Modification Garage inside of your HQ.
There are 4 types of tank modifications and upgrades.
Upgrade tab
This tab allows you to spend your Blueprints in order to upgrade your tanks level.
Blueprints can be obtained by killing Boomers & Frostbanes.
Modify tab
This tab focuses on spending Wrenches and Blueprints to progress your tanks individual parts such as Weapon, Trunk, Wheels, Bumper, etc..
Each upgrade will boost a certain stat based on which part is being upgraded.
Wrenches are the primary upgrade resources that’s used to massively upgrade your tank to the next stage of it’s construction.
Blueprints are used in-between levels that require Wrenches, so make sure you save a few Blueprints if you’re about to finish the last bar of a Wrench level as you’ll need them to progress to the next Wrench level.
Components tab
This tab focuses on boosting various parts of your tank such as Tactical Radar, Heat Sensor, Hubcap, Fuel Cell, Exoskeleton, and Mounted Cannon.
You can upgrade these components by opening “Random Component Boxes” to acquire random parts.
Random Component Boxes come in different levels from 1-4 and can be obtained through various events and shops such as Canyon Clash, Full Preparedness, Glory Shop, etc..
Each box that is opened will give varying quality parts that can be used for specific parts of your tank.
Chip tab
Chips are used similar to Hero Equipment, but for your tank and come in 4 different levels (Green, Blue, Purple, Orange)
Chips can be starred up just like Hero Equipment and the goal is to obtain all Orange chips for each tank.
Tanks are listed by the “Formation” at the bottom of the screen with each Formation corresponding to the Formation of Hero’s for that tank.
Formation 1 = I
Formation 2 = II
Formation 3 = III
Formation 4 = IV
Ideally you will want to set the “Chipset” (top of the screen) to match the Hero’s faction that are in the Formation selected (bottom of the screen).
What this means is that if your 1st tank / Formation are all Wings of Dawn Hero’s (Blue), then you will want to have your “Chipset” set to “Wings of Dawn” so that they match your Hero’s.
Having the “Chipset” set to a different faction will mis-align your Formations to Tanks and render the Chip bonuses useless.
Each Chip will boost various attributes like Troop ATK & Troop DEF, while Orange Chips will provide an extra benefit on top of the aforementioned attributes.
Orange Top Chip (Truck): Adds a small shield to your troops when a battle starts.
Orange Left Chip (Gun): Increases normal and counterattack damage as well as adding a % for your tank to instantly cast a skill twice.
Orange Right Chip (Shield): Increases Troop damage reduction abilities by a specific %, as well as adding a % to increase damage reduction of Hero’s for X amount of time.
Orange Bottom Chip(Satellite): Reduces all enemy Hero’s skill damage by a certain %, as well as boosting your Hero’s skill damage by a specific %
Chip Crafting
You can craft specific Chips by going to the “Chip Crafting” icon under the “Chip” tab.
You will need specific parts such as “Common Chip Material” for Purple Chips and “Advanced Chip Material” for Orange Chips.
Chip Materials can also be used for starring up other Chips, so use this material wisely (especially the Advanced Chip Material)
Chip Materials can be obtained in various ways such as completing the daily Full Preparedness events, resetting unused Chips that were previous upgraded, and purchasing “Chip Chests” from the VIP Shop, Glory Shop, or regular shop for real money.
Chip Reset
If you have extra Chips that you’ve replaced with better quality Chips then you can use the “Chip Reset” option to remove all of the upgrades that were done to that Chip.
Resetting a Chip will provide raw materials that can be used to craft other Chips along with “Chip EXP Cards” which can be used to star up other Chips.
Chip Resonance
Chip Resonance is an extra boost to stats if you have 4 Orange Chips in a single Formation.
The more Orange Chips that you have across all of your Formation, along with the amount of stars that each Chip has, the higher the Chip Resonance bonus
Chip Resonance bonuses can be seen by clicking on the “Chip Resonance” icon under the “Chip” tab.
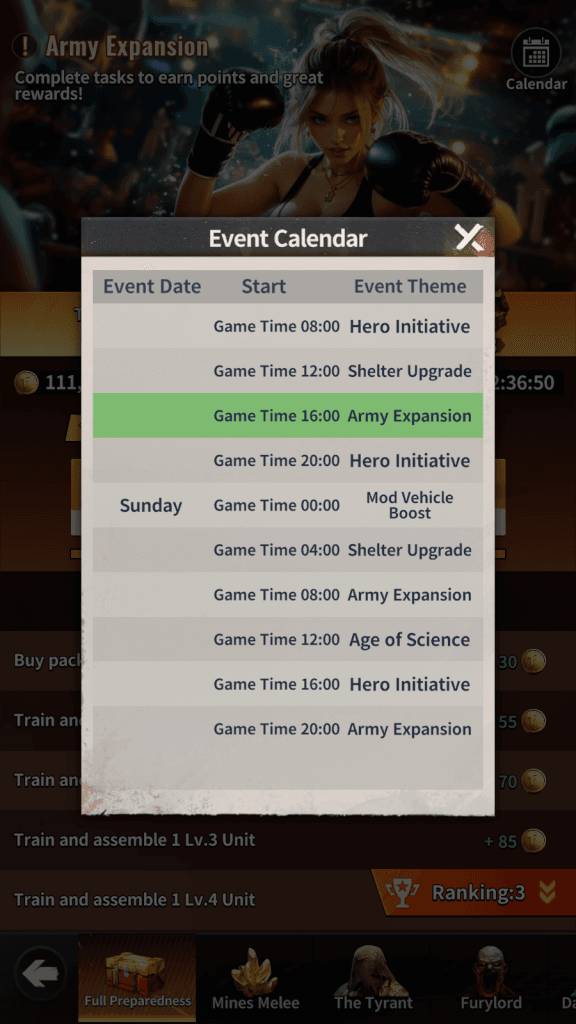
There are 4 weekly events that rotate on a predetermined basis:
Lucky Spin
Gacha Go
Bullseye Booty
Lucky Discounter
These events rotate in that order. Each event corresponds to a specific rare resource and is one of the easier ways to obtain that resource. If you are willing to pay cash these events are some of the better value things to spend on. It’s generally considered good to spend 5-15 dollars daily on these events, with diminishing returns on higher cash spends.
Lucky Spin: Hero Fragments
You get 1 spin free daily for this event.
You can choose the top prizes, generally either Hero or Weapon Frags here.
You can buy 1 spin for 800 diamonds or purchase them with real money.
It is NOT recommended to spend diamonds here, as the cost to expected value is pretty low
Gacha Go: Wrenches
You get 5 free “pulls” per day with Gacha Go.
Most players can get between 12-24 Wrenches per day with the 5 free Gacha Go draws.
Each pull will get you either boxes, keys, or a small amount of some other resource.
Pro Tip: If you need keys to open loot chests there’s an easy way to get them.
Fill up your 4 reward slots with chests and then keep spending diamonds for more loot chances. Ideally you can do this by using the 5 free pulls per day.
Since your loot slots are full, you will only receive Speed Ups, Badges, Alloy, Skill Books, and keys.
Once you’ve gotten enough keys to open a Wrench chest you simply open it and then repeat this cycle.
The best box for a free to play player is 60 keys for 12 wrenches, its recommended to save keys to earn this.
Bullseye Booty: Power Cores
You get Bullets/Shots through completing tasks, purchasing with diamonds, and spending real money.
Its recommended to choose power cores as the resource you are trying to earn.
Pro Tip: You should spend up to the max 10,000 diamonds on this event to unlock Box 12 as this box will get you an Orange Equipment Box.
After box 12 you get diminishing returns.
Lucky Discounter: Badges
Save as many diamonds as possible for this event as you can get up to a 90% discount on various resources in this event.
You get 2 refreshes per day by doing Boomers.
Each refresh has a chance to get 10%, 30%, 50%, 70% and 90% discounts.
This is the best way to obtain badges without any money spent as you can easily earn 20-30k Badges over the course of the week..
Building upgrades are done to enhance your power levels and resource gains, however certain buildings should be prioritized based on which building it is and what it does.
Farms, Windmills, Houses, and Alloy plants should ideally not be leveled past 25 unless you have free builders and available resources. Leveling these builds past 25 yields less power results than increasing other buildings like your HQ, Troop Camps, etc..
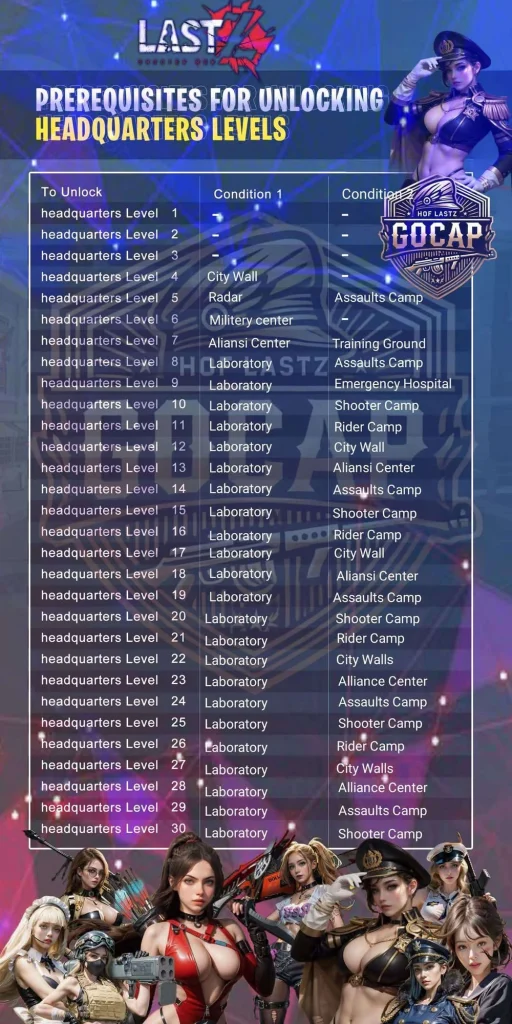
Below is a cheat sheet of what’s required to upgrade your HQ to Level 30.
Batch healing can be a great way to recover troops very quickly.
Tips & Tricks:
Heal in batches of 40-100 tops
The time it takes to heal will depend on the amount you select, Alliance participation, and how powerful the Refugee’s that you have are.
You can set your troop heal amount by clicking the “Deselect All” button in your hospital and then manually entering in your preferred number of troops to heal.
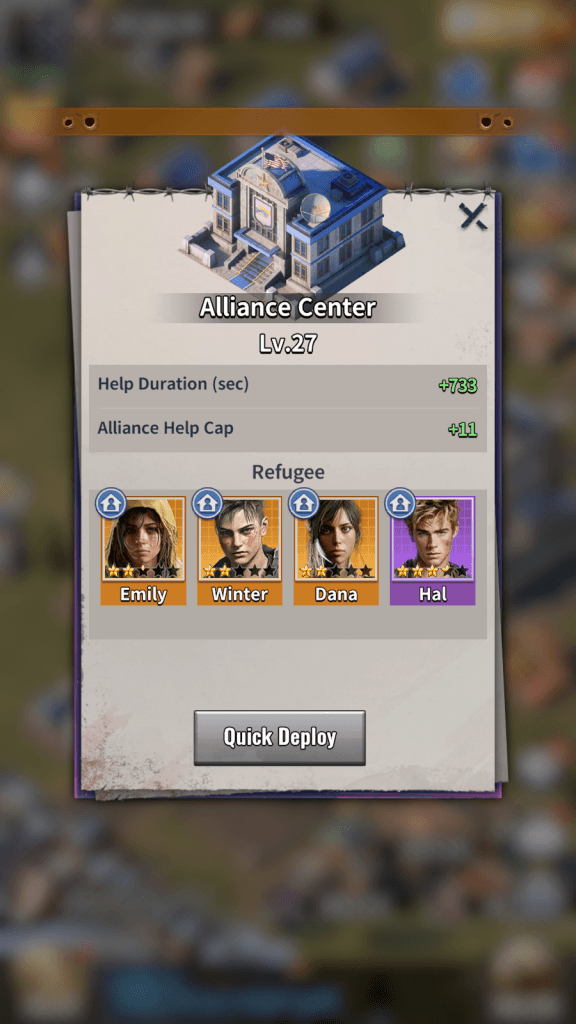
Increase healing time reduction by adding Diplomat Refugees to your Alliance Center.
For each Diplomat that you deploy, your overall Alliance Helping Hands time reduction is increased.
By starring up your Diplomats you can increase the time reduction by upwards of 10+ minutes per click, which can greatly reduce heal times, building times, research times, and any other Helping Hands based time reductions.
When recruiting Refugee’s, focus on recruiting Purple and Orange Refugee’s that you already have. When recruited, these Refugee’s will turn into star fragments that can be used to star up your Diplomat Refugee’s.
As seen in the image below, with only 2-3 stars per Diplomat you can increase your time reduction by 12min per click.
***Note: As of 11-18-25 this trick may no longer work as excess Alloy is now converted into “Hero Equipment EXP (Refund)” resources.***
There is a neat little trick that allows you to convert Blue and Green gear into Alloy for use with getting points on Hero day (Day 4) of VS.
Take a piece of Blue gear and equip it to a Hero
Enhance that piece of Blue gear using other Blue/Green gear until it’s maxed out at Level 20. (You’ll notice that any excess levels will be converted into Alloy)
Take a fresh piece of Blue gear and equip it.
Enhance this new piece of Blue gear with other Blue/Green gear up to Level 19 (or as close as you can get to it without hitting Level 20)
Add your Level 20 Blue piece of gear from Step #2 and complete the enhancement. You’ll notice between 40k-80k+ of Alloy will be given to you as excess Alloy.
Rinse and repeat steps #3-#5 whenever you get new Blue/Green gear.
Gaining More Glory Badges in the Caravan
The Hero Battlefield Caravan allows you to send your Hero’s out on repeatable missions to fight for Glory Badges, Hero Battlefield Honor Crates, Hero EXP, and other Resources
Glory Badges can be exchanged in the Glory Shop for various items including Equipment Cores, Badges, Wrenches, Hero / Hero Weapon Fragments, Tank Mod / Chip chests, Speedups, EXP, Resources, etc..
Hero Battlefield Honor Crates can be opened for a chance to get Hero Fragments, Speedups, Diamonds, and a rare chance to get 50x Golden Wrenches
As long as you can progress through each level you will gain all of the items listed above, but once you reach a level that you can’t beat, you are effectively stuck unless you do one of the following actions.
Gear Swapping
You can progress further through the levels if you do each faction one at a time.
What this means is that once you’ve completed the highest level possible on your highest march (Wings of Dawn, Blood Rose, or Guard of Order), you can then unequip that team’s gear and apply it to your next highest march.
What this does is allow you to boost your 2nd, 3rd, and 4th (if purchased) marches in order to complete higher levels.
Just make sure you re-equip your gear to the respective hero’s once you’re done with the Caravan levels.
Complete Lower Levels
A little known tip is that if you’re stuck on a high level, you can always complete a lower level for slightly reduced rewards. While this may sound counter-intuitive to maximizing your rewards, it’s actually more beneficial.
If you perform a lower level that you know you can complete, not only will you get the full Glory Badge rewards for that level, but you will also get 5 Hero Battlefield Honor Crates as well (15 total for all 3 factions)
The Battlefield Honor Crates will give you various resources, exp, and a chance for 50x Golden Wrenches to upgrade your tank with.
The Tyrant is an event that can happen up to 3 times per week and rewards valuable resources upon completion.
This event is a 15-min all out battle with the Tyrant. You will be defeated, but it’s your damage output that matters.
You can boost your damage output by getting Capitol Buffs like War Commander or initiating an HQ attack on an enemy HQ and then recalling it. This will give you a damage buff without actually attacking the HQ.
It’s a good idea to disable auto-grouping during this event in case someone starts killing Boomers or Saga Zombies
It’s considered a bad move to start Boomers, Saga Zombies, or Dig Holes during this event.
Once the Tyrant has been defeated you can get resources like Power Cores, EXP, and other resources from the event.
The daily Versus (VS) event is a cross-server PVP based event that allows for contributing resources to gain points while also opening chests to receive valuable resources like Badges, Valor, etc.
Saving your resources for specific days can greatly increase your points and in-turn your power levels, so make sure you spend your resources on the days noted below.
Below is a list of each day’s VS event and what’s needed to gain points.
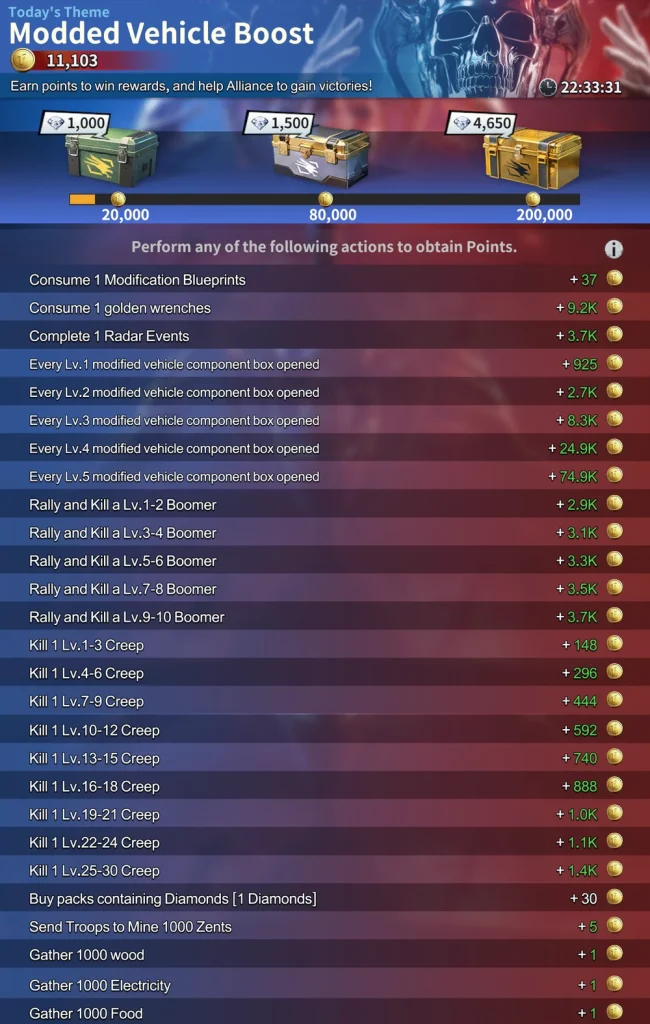
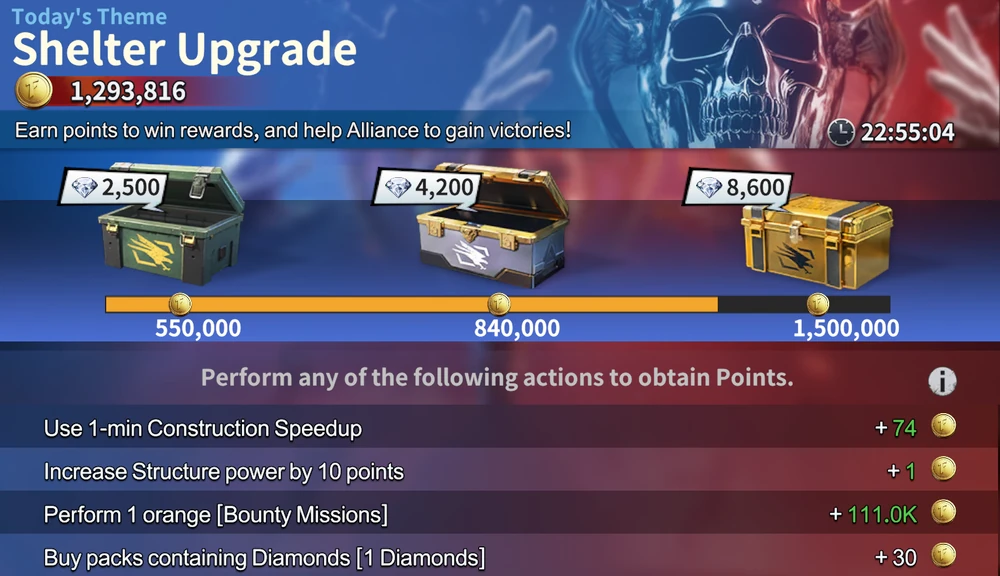
Day 1: Modded Vehicle Boost
This day focuses around your tank and boosting it’s power.
You can get points by doing the following:
Spending Wrenches, Blueprints, and Components on your tank.
Killing Boomers and Zombies
Mine resources like Wood, Food, Zents
Completing Radar events
In-DepthBreakdown
Monday is all about upgrading your tank and stacking Radar Events
Stacking Radar Events
The day before (Sunday) VS starts you should complete your Radar events but DO NOT claim them. What this does is allows your events to carry over to the next day to be used for extra VS points.
Mining & Gathering
On Day 1 of VS you can get a few extra points by sending out tanks to gather resources like Food, Wood, Zents, and Electricity.
You should have at least 2 marches gathering resources at all times.
Before sending out troops you should try to get the Capitol Buff: Secretary of Agriculture. Having this buff will give you a 30% increase to mining speed.
Blueprints
DO NOT spend Blueprints on any other day except for Day 1 (Mondays).
The best time to spend Blueprints is during the “Mod Vehicle” Full Preparedness window. This way you get points for both VS and for FP.
You can get Blueprints by killing Boomers/Frostbanes. The higher the level the more Blueprints you get.
Enhancement Chips & Component Boxes
Only open these two types of tank upgrade boxes during Day 1 of VS.
You can get these boxes from enemy Trucks and Full Preparedness chests
Wrenches
You should only be spending Wrenches to upgrade your tank on this day.
The best time to spend Wrenches is during the “Mod Vehicle” Full Preparedness window. This will help to maximize points for both events.
Since Wrenches are the hardest resource to find in the game, there are a few ways to get them.
Dig Holes – These can give you at least 5 Wrenches per dig and sometimes you’ll get lucky and get a 2X multiplier for 10 Wrenches in total.
Gacha Go (Mini Game) – This is the best way to get Wrenches as it allows you to spend diamonds for chances to get loot chests and keys.
Most players can get between 12-24 Wrenches per day with the 5 free Gacha Go draws.
Pro Tip: If you need keys to open loot chests there’s an easy way to get them.
Fill up your 4 reward slots with chests and then keep spending diamonds for more loot chances.
Since your loot slots are full, you will only receive Speed Ups, Badges, Alloy, Skill Books, and keys.
Once you’ve gotten enough keys to open a Wrench chest you simply open it and then repeat this cycle.
VIP Shop – If your VIP level is high enough then you can get a handful of Wrenches in exchange for diamonds.
Glory Shop – Similar to the VIP shop, you can spend your Glory points to get Wrenches, Enhancement Chip boxes, and Component Boxes
Boomers / Frostbanes
You can get some extra points by killing high level Boomers/Frostbanes, but you should only do this if you have the extra fuel to burn.
Be careful killing excess Boomers/Frostbanes as you may need that fuel for other events like Glory Way, Enemy Buster, State vs State, etc..
Day 2: Construction
This day focuses on building your power through upgrading your buildings and recruiting Refugees
You can get points by doing the following:
Spending 1-min Construction speed-ups on buildings
Performing Orange Bounty Missions (up to 7-8 missions per day)
Recruiting Orange, Purple, and Blue Refugees
In-Depth Breakdown
Tuesday is all about Construction Speedups, Orange Bounty Missions, and Recruiting Refugees
Orange Bounty Missions
You ONLY get points for Orange missions. No points are awarded for purple and blue missions.
Make sure to refresh your events until you find orange missions. This will require refresh tokens which you can get by attacking Trucks that contain them.
Refresh tokens are a relatively rare resource, so only do refreshes on Construction and Holistic Growth VS days.
Refugees
You can get points for recruiting refugees, ideally orange but you get points for any level of refugee.
You can get 5000 Refugee Recruitment tickets from Glory Shop weekly, this is the easiest source of refugee tokens.
You can also get Refugee Recruitment tickets by attacking the Fury Lord each day.
ProTip: Diplomats are by far the most useful refugee type to star.
Diplomats provide the most benefit from upgrading as they allow you to stack “seconds off” of EVERY task when an Alliance member clicks on your help request. This can stack very high and potentially add 10-15min+ off for each click.
Staring up Diplomats will multiply the effects of helping hands, so they speed up basically everything including: Healing, Construction time, Research time, etc
Pro Tip: Duplicate Refugees give you Orange or Purple fragment points to level up your Refugees with. Use these points wisely to improve areas like resource growth, time decreases for Alliance help requests, etc..
Construction
You get points for speeding up Building Construction and completing Building Construction.
You DO NOT get points for starting construction, so if you plan correctly you can start buildings during the week and finish them on construction day.
ProTip: You can view the amount of Construction Speedups you have by going to Warehouse -> Statistics (Bottom Right Corner) -> Speedup tab
Wait for Full Preparedness to maximize gains
What buildings to upgrade:
HQ Level below 27:
First get Camps (Shooter, Rider, and Assaulter) to 24 for T8 troops then ONLY the buildings that let you upgrade HQ level. HQ 27 as fast as possible your goal now
Above 27:
First get Camps to 27 for T9 troops, then level up buildings as you see fit.
You don’t get T10 buildings until you get HQ30, Lab30, and spend approximately 1 Million badges to finish Unit Special Training Research.
Your goal is to increase your actual power as much as possible, so only upgrade HQ when you feel comfortable with your power level
Day 3: Research
This day focuses on increasing your power through Research.
You can get points by doing the following:
Spending 1-min Research speed-ups
Spending Badges to perform Research
Sending out Orange Trucks (3-4 per day)
In-Depth Breakdown
Wednesday is all about Research and Trucks
Trucks
You get points for doing only S (Orange) Trucks.
You get no points for A, B, C, and D trucks, so refresh your truck until you get an S rank truck
Pro Tip: Our advice is to send one truck at a time with your strongest march. This is done as an attempt to avoid getting looted, as most players do looting right at reset and tend to target weaker trucks.
Research
You get points for spending Badges, using Research Speedups, and Completing research.
You should do Research that costs badges today and other days you can do research that does not cost badges.
Only use Research speedups today.
Badge Sources:
VS Boxes, Season Glory Screen (Rewards), Cold Hoof Animals, and Lucky Discounter Weekly Event.
Lucky Discounter requires large amounts of diamonds and is the best bang for your buck. Ideally you should save as many Diamonds as possible to spend in this event.
Wait for Full Preparedness to maximize gains
Research Tips
Alliance Recognition is the best research to focus on.
This will be the best way to boost the amount of badges you obtain and will help speed up all other research.
Note: After completing Alliance Recognition your focus should be on troop based Research as it can greatly increase your power levels.
Troop based Research trees are primarily Military Strategies, Siege to Seize, and Peace Shield.
Getting Military Strategies to 60% unlocks Siege to Seize and 80% will unlock Peace Shield.
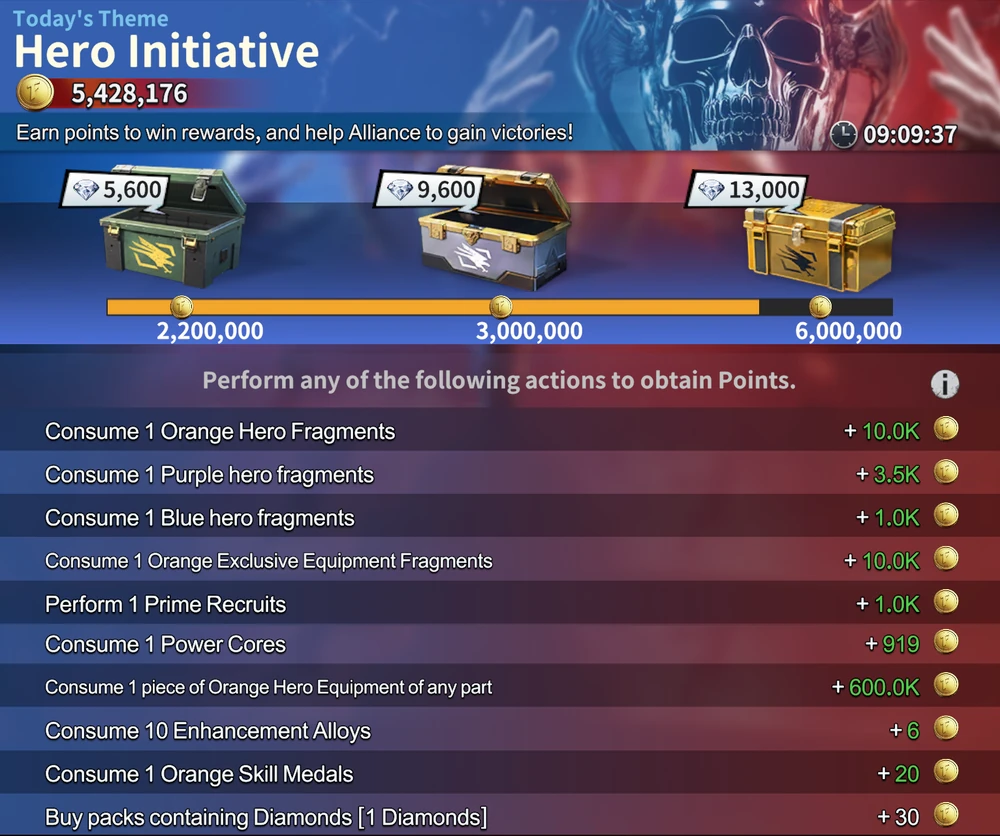
Day 4: Hero Initiative
This day focuses on increasing your power by upgrading your Hero’s Star levels and Skills
You can get points by doing the following:
Spending Orange, Purple, and Blue Hero fragments
Spending Orange Skill books to level up Orange Hero skills
Spending Power Cores to enhance Orange Equipment
Spending Alloy to enhance equipment
Note: You should focus on upgrading Orange gear first and then Purple (if needed)
Performing Hero Recruitments
Note: There are sometimes one-off Fragments that can give you massive points, however these often times require a purchase of the Hero, Gear, or Weapon. The cost for these is normally ($19.99)
In-Depth Breakdown
Hero day is all about leveling up your heroes and their equipment. This guide is long but Hero day is the day you increase your power the most
Hero Fragments
You can find hero fragments in a variety of ways: Prime Recruits, Full Preparedness, Daily Tasks, VIP Shop (Level 10), Glory Shop, and Lucky Spin Weekly Event
You want to get the heroes in your First March to 4 stars one at a time, then start on the 5th star. The biggest power boosts from each hero tend to occur at 4 stars.
Ideally all of the heroes in a march are the same faction. This is due to 2 reasons
1. Many heroes give a bonus for deploying all heroes of the same faction
2. You get a 15% damage boost
To unlock a hero you need 20 hero exclusive fragments.
There are two ways to obtain these: Get lucky with Prime Recruit tickets, or pay money.
Pro Tip: For those willing to spend the cash: Warrior Battle Pass is the cheapest way to obtain Fragments.
You will get the Hero from the pass close to 3 stars.
If you miss out on the pass, the only other way is the Integrated Daily Sale, which is far more expensive.
Weapon Fragments
Similar to hero frags, some heroes have Exclusive Equipment that can be starred up using weapon frags.
These can be obtained through Glory Shop, Chill Trunk Animals, and the Lucky Spin Weekly event.
These fragments can only be purchased through Warrior Battle Pass or Integrated Daily Sale. You CANNOT earn these through Prime Recruits.
Prime Recruits
While you normally would only be spending 1 Prime Recruit per day to complete the Daily Tasks, this VS day is the day to use them all.
Equipment
Your goal is to equip your first march with all Orange equipment and upgrade that equipment with Power Cores and Alloy.
Fully upgraded Purple Equipment is weaker than Base Orange Equipment with zero upgrades.
You get Orange Equipment in a few ways: Spending Valor, Exploration, and Furylord Achievements.
By far the most effective way is to spend 15k Valor from the Merit Shop to get one Orange Equipment box. This should be done weekly.
Note: Do not use Orange equipment to upgrade another Orange equipment piece unless ALL of your marches are already equipped with Orange gear. You are always better off equipping second and third marches with Orange equipment.
Alloy
Used to level up all equipment. First get each piece of Gold Equipment to level 20 to unlock power core promotion, then upgrade as you see fit.
The primary way to acquire Alloy is VS boxes and Smelting Plants.
If your Alliance recognition research is fully maxed, you can get 220,000 alloy a day from opening all VS Boxes.
Pro Tip: You can convert Blue and Purple gear into Alloy by performing the following actions:
Take a piece of Blue gear and equip it to a Hero
Enhance that piece of Blue gear using other Blue/Green gear until it’s maxed out at Level 20. (You’ll notice that any excess levels will be converted into Alloy)
Take a fresh piece of Blue gear and equip it.
Enhance this new piece of Blue gear with other Blue/Green gear up to Level 19 (or as close as you can get to it without hitting Level 20)
Add your Level 20 Blue piece of gear from Step #2 and complete the enhancement. You’ll notice between 40k-80k+ of Alloy will be given to you as excess Alloy.
Rinse and repeat steps #3-#5 whenever you get new Blue/Green gear.
Power Cores
You want to get each piece of Orange equipment one full core at a time rather than spread cores around your equipment equally.
You get extra equipment attributes for each full core such as Troop Damage or Hero Attack.
You can get Power Cores through Valor Shop, Tyrant Event, and Bullseye Bounty Weekly Event.
For Valor Shop, first spend 15k on Orange Equipment until 1st march is all gold then get the 1000 power cores for 30k.
Reverse the order after fully equipping the first march, cores then equipment for the second and third marches.
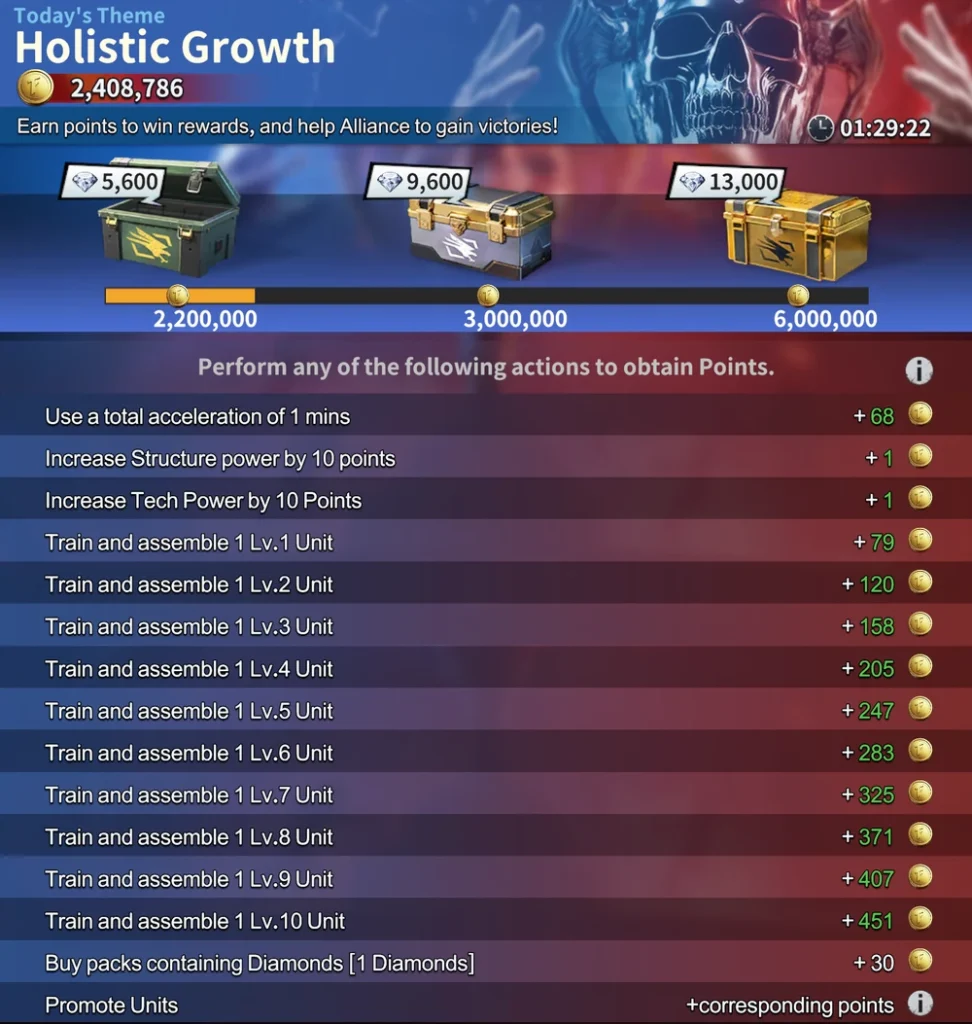
Day 5: Holistic Growth
This day focuses on increasing your power by training troops.
You can get points by doing the following:
Training and/or Promoting troops
Completing Radar events
Using 1-min Speed-ups
In-Depth Breakdown
This hero day is primarily about training troops, with some points coming from Research and Construction
Training Troops
Save your troops speedups for today.
You want to train and promote as many troops as possible as this is the best way to get points.
Pro Tip: If you are at max troops, you can kill troops using an allies HQ, just make sure you ask for permission before attacking.
When attacking an allies HQ to kill troops, send your lowest powered tank only. You’re just wanting to kill troops, not burn their HQ.
Note: It’s wise to kill off some troops beforehand so you can train them during this day, but don’t put yourself short as this day is also when Canyon Clash happens and you’ll want to have your full set of troops available for this event. It’s a good idea to time your troop kills and training around this event to ensure that you’re ready to go when the event starts.
Construction and Research
It’s generally preferable to spend your construction and research speedups on their respective VS days. However if there is something that will finish before the relative VS day, it’s ok to spend some speedups here to get some extra VS points.
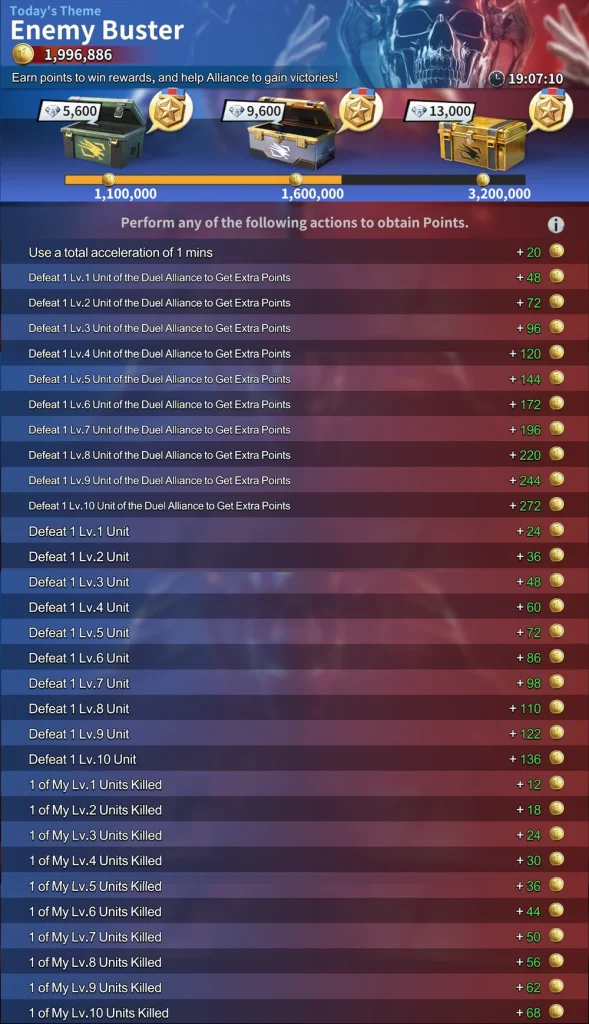
Day 6: Enemy Buster
This day focuses on killing your opponents troops.
You can get points by doing the following:
Teleporting to your opponents base and performing Tank-v-Tank (TvT)
Hitting your opponents HQ and burning them
Hitting other players tanks or HQ’s
Sending out Orange Trucks
Performing Orange Bounty Missions
Using 1-min Speed-ups
Note: Hitting your opponent’s Tanks and HQ’s give the most points, but if your opponent is too weak or too few, you can hit other players on this day to get points as well. Just make sure you don’t violate any Non-Aggression Pacts (NAP) (if applicable)
In-Depth Breakdown
This VS Day is all about fighting enemy states, along with Orange Bounty Missions and S (Orange) Trucks.
You have 2 options today: Shield or Fight.
At Reset strong players from other states will attack our hive.
If you are not under a shield or confident in your strength, your base will be destroyed and you will give away points and resources to the enemy.
Shielding Guide
You must be shielded before reset to be safe.
You can use Peace Shields either directly from your Warehouse or from the Buff tab in the City Walls screen (Viewable by clicking on your HQ from the world map.)
You can purchase Peace Shields from 2 places: The Alliance Store and the Item Shop.
Alliance Store is the recommended place to purchase shields from as they only cost you Alliance Coins instead of diamonds. You obtain alliance coins from hitting Helping Hands and Looting Trucks.
When shielded, you can still get points for reinforcing the HQs of alliance members that are fighting. This action ups their defenses when their HQ gets attacked and will get you points for killing the enemy’s attacking troops.
For weaker players – Farming
Stay shielded until at least several hours after reset.
Most fighting takes place in the first few hours, the best thing to do during this time is to shield and reinforce our stronger HQ’s that are fighting.
Attack small HQ’s outside of hives in the enemy state:
You can use the free teleport from the Enemy Buster screen to teleport anywhere in the other state.
Search the state for low level HQ’s that you can easily defeat to get points.
Note: There will be a 10 minute cooldown where you cannot shield after attacking an HQ
For Strong Players – Fighting
If you are confident in your strength, there are two options for fighting: Defending or Attacking.
Note: You get double points for killing VS opponents and they get the same. If you lose a fight, you are giving points to the enemy.
Defending
This is when you stay in our hive and try to fight off enemy HQ’s and Tanks that are attacking our unshielded players.
You will be fighting strong HQ’s, so be very confident in your strength before doing this.
Pro Tip: If you realize that you are going to be attacked by enemies you will not be able to defend against, you can use the free teleport from the enemy buster screen to escape to the enemy state. Find an empty area to port to and hide there until you can either shield or heal enough troops to rejoin the fight.
Attacking
This is when you port to the enemy state and attack their unshielded HQs.
The best time to do this is right at reset. Don’t do dailies, immediately port at 0:00 and start attacking.
At this time the enemy alliance will most likely have unshielded low level HQ’s you can farm vs points off.
In addition, some of their stronger players will be doing dailies so they will be a little less likely to respond.
Pick your target beforehand, get a few hits in, and port back once the enemy starts responding.
Pro Tip: If you get attacked while in the enemy state, go to Enemy Buster screen and start spamming the teleport button.
You cannot teleport while being attacked, but as soon as they get one victory you will have a small window of time between the end of one attack and the start of another to teleport back to relative safety.
Ideally you will avoid being attacked multiple times doing this.
Batch Healing
During Enemy Buster many of your troops will be injured. Instead of trying to heal troops all at once, it’s much much faster to heal 50 at a time.
If your diplomats are leveled high enough you can heal 50 with two or three helping hands.
You can often heal 50 troops in a few seconds and can do this repeatedly until all troops are healed.
This technique also gives more alliance coins to your fellow alliance members as they will have more opportunities to hit helping hands.
Orange Bounties and S Trucks
Similar to Construction and Research Day, you can get points for doing Orange Bounty Missions and trading with S (Orange) Rank Trucks.
You only get points for Orange and S ranks, so refresh until you get those.
Zombie Siege is an endurance test event happens once per week and is normally set to run on Mondays before reset. This event allows us to gain extra wrenches and additional resources by completing the event.
Below are some general tips and tricks for this event.
Ensure your “Wall Hero’s” (defenders) are the same as your most powerful formation (Troop 1) and keep that tank at home. (ex. Your main tank has all Wings Hero’s, so set those Hero’s to be on your wall)
To add Hero’s to your Wall you click on your Walls at the front of your HQ and then select the Hero’s that you want to be on the Wall itself. If you don’t select any Hero’s for your Wall then the game will automatically add your most powerful Hero’s to your wall based on which Hero’s are at home during an attack.
Shields DO NOT WORK during the Zombie Siege, neither does teleporting. This event is an endurance test and you will eventually be defeated.
If you max out your personal and Alliance points you can get a maximum of 13 wrenches at the end of the event. There are additional resources given a few days after the event ends, but those are primarily Hero Recruitment tickets and other miscellaneous resources.
As of this time, the maximum zombie that will attack will be an Elite Level 27 zombie. After this attack is done the event is over.
How to get points during Zombie Siege
After following point #1 above, you can then send out your 2nd and 3rd (and/or 4th) tanks to reinforce your neighbors. This will get you more points than just keeping all of your tanks and troops at home. It’s also good for helping out your allies during this event.
Once someone’s HQ has been hit twice they are out of the event so there’s no further need to reinforce them. Pick someone else who’s still participating to reinforce.
Canyon Clash is a weekly event that up to 20 players can participate in. This event is a capture-the-flag type of event that rewards Valor Medals and other resource rewards.
The general strategy for Canyon Clash is as follows:
Upon the start of battle, teleport to a random Water Building and capture it.
When the Canyon Boss spawns (upper right corner), teleport to it and attack.
When the Military Bases open up, send 1 troop to reinforce them. This can be your 2nd march. If you have 4 tanks you can send your 2nd and 3rd marches to reinforce both bases.
When the Energy Core is ready, someone with higher power will normally grab it and when this happens you should assist with defending the Core Carrier until the Core has been deposited at our base. The Core rewards 100k points in the battle and can provide for an easy win OR turn the tide of battle.
While not fighting or reinforcing a base you can send your lowest tank to a mine to gather resources and points.
If your base gets teleported don’t worry as you can freely teleport around the map every 2min~ or so. Strategically teleporting can help us win more easily.
Pro Tip: If the enemy Core Carrier is strong you can target their HQ, and if you can port it, their tank will drop the Energy Core when they reset allowing someone else to pick it up.
Valor Medals can be obtained in a few different ways.
Daily Arena – You can get between 400-800+ Valor Medals per day just for participating
Canyon Clash – Participating in this event can yield between 2k-15k Valor Medals per week.
VS Enemy Buster – Participating in hitting opponents HQ’s, TvT, and opening chests on this day can yield varied amounts of Valor Medals. It’s always good to try and participate on this day if possible. ** Note: This is Day 6 (Saturday) of VS. You only need to shield when you’re about to go offline or if you’re being targeted. Even when shielding you can reinforce your neighbors to still earn points. **
Capitol Clash – This is the main event that earns you a ton of Valor Medals. This event normally happens around twice per month and participating in this event can earn you between 2k-40k Valor Medals per event. The process here is similar to VS Enemy Buster, however it’s focused in a small area around the Capitol. You can do either TvT or participate in teleporting enemy HQ’s. If you are trying to port enemy HQ’s, make sure you target lower HQ’s or wait for a group of higher power tanks to assist when trying to port.
Spending Valor Medals
You can also purchase Purple gear if you have excess valor and need to replace Blue and Green gear.
If you participate in the majority of events listed above then you should be able to buy 1 piece of Orange gear (15k Valor) and ideally 1000 Power Cores (30k Valor) respectively.